Divemaster Dive Site Mapping Drill – Methods and documentation.
Introduction.
One of the skill building exercises of the PADI Divemaster education is a mapping project:
Have divemaster candidates in buddy teams survey an open water dive site and create a detailed map of the site showing (as applicable to the site) underwater relief, important points of interest, any relevant environmental notes, recommended entry/exit areas, local facilities and potential hazards.
The result of this drill is documented in "Divemaster Dive Site Mapping Drill, Part 1: Almindsoe Lake Dive Site (Result)", and is supposed to be handed out to divers wanting to visit the lake in its paper form The present document deals with the methods used.
Facts.
| Dive site chosen | Almindsø Lake, Silkeborg, Denmark. Altitude 21 metres above MSL |
| Candidate | Claus Nedergaard Jacobsen, Denmark |
| Candidate PADI ID | <nondisclosed> |
| Instructor | Ben Bos, NOW Dive |
| Instructor, PADI ID | <nondisclosed> |
| Buddies | Several |
| Time period | March 4 – March 7, 2020 |
| No of dives | 9 |
| Equipment |
|
Methods chosen – and why.
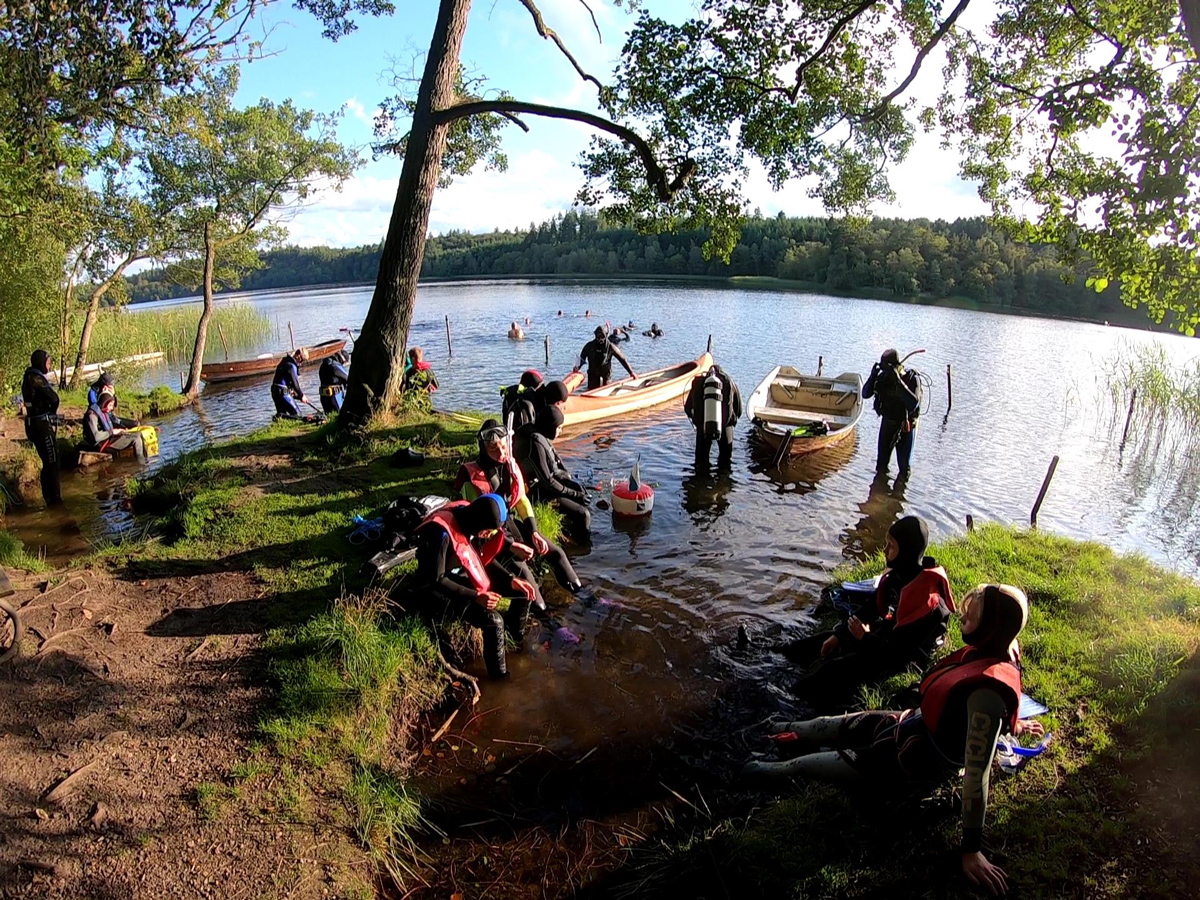
The PADI Divemaster Manual specifies a method where you would measure the underwater contour of a dive site by swimming a square pattern over the bottom, navigating by compass, measuring distance by fin kicks and noting points of interest and depth along the pattern. Then you draw your noted depths and distances in a map and create a contour map by interpolating between measurement points. Somewhere it says that the area must be at least 100 m x 100 m. This method may give you a contour relief for a tiny portion of Almindsø Lake, but you will not find anything interesting. All the interesting stuff is to be found in the 0 – 4-meter depth range close to the shore and up to 2o meters away from it. The shoreline is close to 4 km long. In the rest of the lake there is nothing but mud and clay – and darkness below 8 – 10 meters. And depth contours are already freely on the internet from the local fishing club (“Silkeborg Fiskeriforening”). We did, however, map a 100m x 100 m area, just to demonstrate that we can use the skills. See later. We also picked out two deep points (18,5 and 19,0 meter) that might be useful for training purposes and a tiny wreck, wrote instructions on how to find these points using compass and stopwatch and verified ourselves that it is possible to find the points using our directions. See later.
Depth Contour Mapping
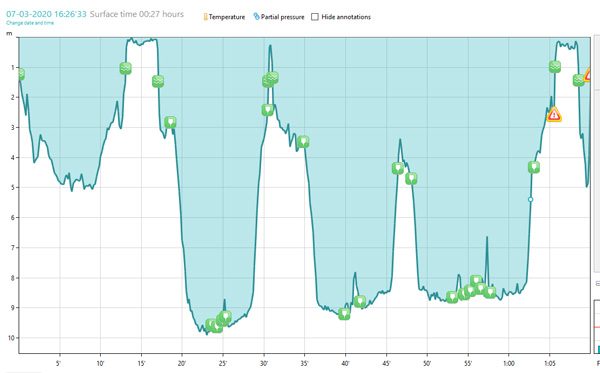
Rather than counting fin kicks to determine distance we started out measuring our swimming speed using frog kicks and left the depth logging to the dive computer (right arm with the computer within 20 cm of the bottom). We used the stopwatch to time each leg. At the same time, it leaves a marker on the dive log. With a few notes in our wetnotes we can trace where we were at each marker point and in between using interpolation and assumption of constant speed.
We measured our frog kick swimming speed by suspending a 50-meter garden measurement tape from Harald Nyborg between two “pet mount spirals” from the same company and then timed three traverses of this distance using our dive computer stopwatch. The results said 2:29 minutes, 2:43 minutes and 2:23 minutes, an average of 2:32 minutes per 50 meters. For the limited precision required for this report, we assume 5 minutes = 300 seconds per 100 meters. It should be noted that yours truly is a fast swimmer, so for our directions in the other report, we assume 40% more, i.e. 7 min/100 m (we do not want to discourage other divers and make them turn before they reach the target).
 |
 |
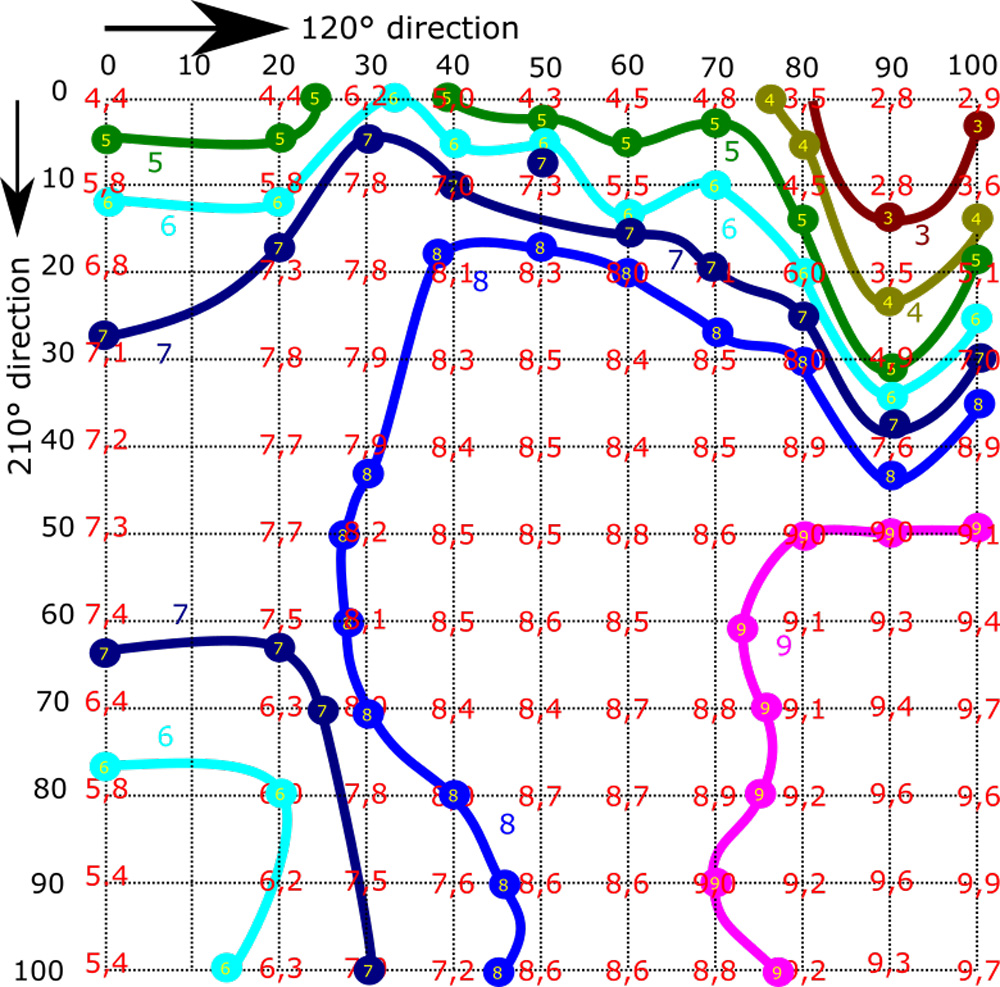
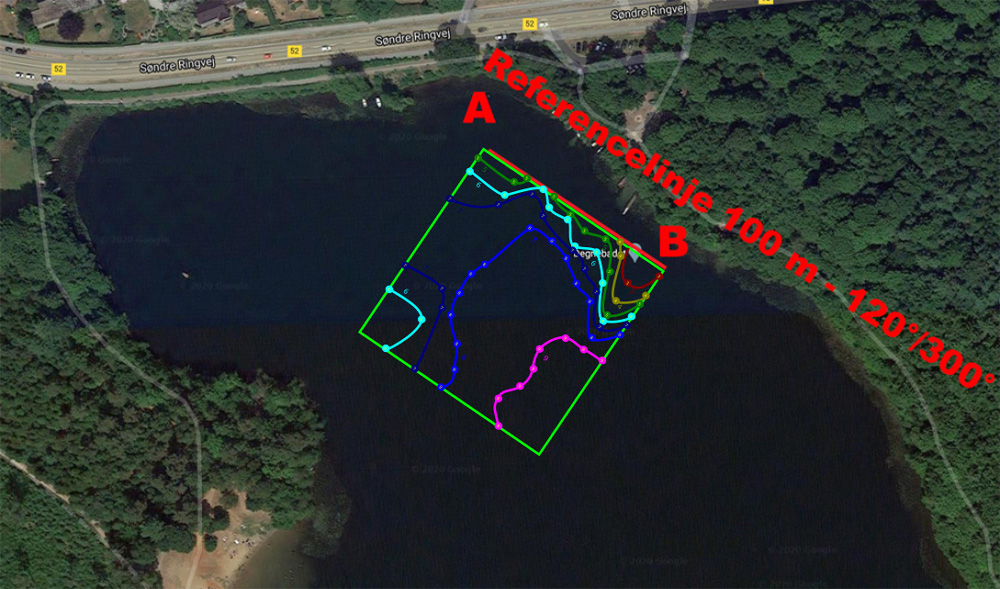
For the contour mapping we suspended the measurement tape twice along a compass bearing of 120° along the coastline, then surfaced at both ends to measure position by cross-bearing objects visible on Google Maps, roughly orthogonal to each other. (We used the tip of ness at Aggerholm and the bridge at “Degnebadet”). In this way we established a reference line that can be found again should anyone want to use our measurements.
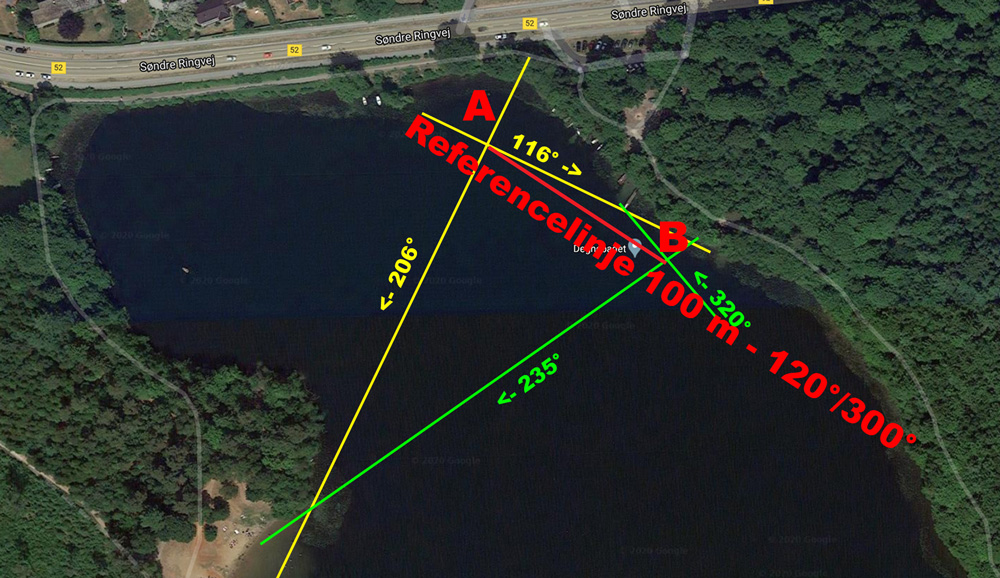
The reference line is angled at 120°, endpoints name A and B as shown above. We decided to make a pass every 10 meters, a total of 11. So, we
- At A, start the stopwatch
- Swim bearing 120° + 90° = 210° for 5 minutes (~ 100 m) with the computer at the seabed
- Stop the stopwatch
- Turn left 90° to bearing 120°
- Swim for 30 seconds (~ 10 m)
- Turn left 90° to bearing 30°
- Start the stopwatch
- Swim bearing 30° until we reach the measurement tape = reference line
- Stop the stopwatch
- Notice where we hit (should have been 10-meter point) and swim to 20-meter point
- Turn right onto bearing 210° and start the 3rd pass.
- Etc etc until we are done with the area
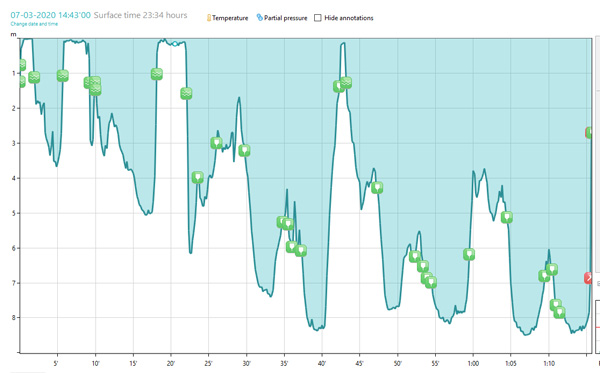
This cost 2 dives. After that, it was a matter of reading out our dive log profiles, finding the start and stop of each pass and plotting the depth onto a map, doing some math to compensate for different swimming speeds and navigation errors (not hitting the expected spot on the measurement tape or not at exactly 5 minutes). Then we connect points with equal depth to arrive at the depth contour. Result is given below.
 |
 |
| X/Y | 0 | 10 | 20 | 30 | 40 | 50 | 60 | 70 | 80 | 90 | 100 |
| 0 | 4.4 | 2.5 | 4.4 | 6.2 | 5 | 4.3 | 4.6 | 4.8 | 3.5 | 2.8 | 2.9 |
| 10 | 5.8 | 3.4 | 5.8 | 7.8 | 7 | 7.3 | 5.5 | 4.5 | 2.8 | 3.6 | |
| 20 | 6.8 | 5.1 | 7.3 | 7.8 | 8.1 | 8.3 | 8 | 7.1 | 6 | 3.5 | 5.1 |
| 30 | 7.1 | 7.7 | 7.8 | 7.9 | 8.3 | 8.5 | 8.4 | 8.5 | 8 | 4.9 | 7 |
| 40 | 7.2 | 8.2 | 7.7 | 7.9 | 8.4 | 8.5 | 8.4 | 8.5 | 8.9 | 7.6 | 8.9 |
| 50 | 7.3 | 8.3 | 7.7 | 8.2 | 8.5 | 8.5 | 8.8 | 8.6 | 9 | 9 | 9.1 |
| 60 | 7.4 | 8.3 | 7.5 | 8.1 | 8.5 | 8.6 | 8.5 | 9.1 | 9.3 | 9.4 | |
| 70 | 6.4 | 8 | 6.3 | 8 | 8.4 | 8.4 | 8.7 | 8.8 | 9.1 | 9.4 | 9.7 |
| 80 | 5.8 | 8.1 | 6 | 7.8 | 8 | 8.7 | 8.7 | 8.9 | 9.2 | 9.6 | 9.6 |
| 90 | 5.4 | 7.3 | 6.2 | 7.5 | 7.6 | 8.6 | 8.8 | 9 | 9.2 | 9.6 | 9.9 |
| 100 | 5.4 | 6 | 6.3 | 7 | 7.2 | 8.6 | 8.6 | 8.8 | 9.2 | 9.3 | 9.7 |
Marked into a map and connecting equal depths we get:
Or transferred onto the real map, we get:
Lessons learnt.

Underwater compass navigation is far more difficult than it sounds especially in low visibility where you cannot fix your eyes on objects far away. It is easy to get off track. We learnt that if you carry your compass on your arm, and you swim in trim position as you are supposed to in a drysuit, you really must bend that arm all the way beneath your chest to get the angles correct. But having to bend your head to watch the compass puts you at risk of losing balance which in turn means losing your direction. If we were to conduct a similar mapping project in the future, we would look for a compass that could be held in front of you and with a more pronounced direction of travel line than the ones we used. Or we would suspend lines to swim along.
Points of interest
In this section we are referring to entry points 1, 2, 3 and 4 presented in the main report:

The seabed below 4 meters is not really of any interest in Almindsø Lake. We have merely mapped a tiny portion of it to demonstrate the use of techniques. The interesting points are:
- The reed forests within 20 meters of the coastline – where the fish hide. Up to 4 meters depth. In some places they are wider, in some places they are narrower, and in some places, they are missing. But it does not really make sense to map them because it is impossible to miss them if you simply go right or left from any recommended entry point and swim at max. 3 meters depth. We have shown a few in our map – approximate location.
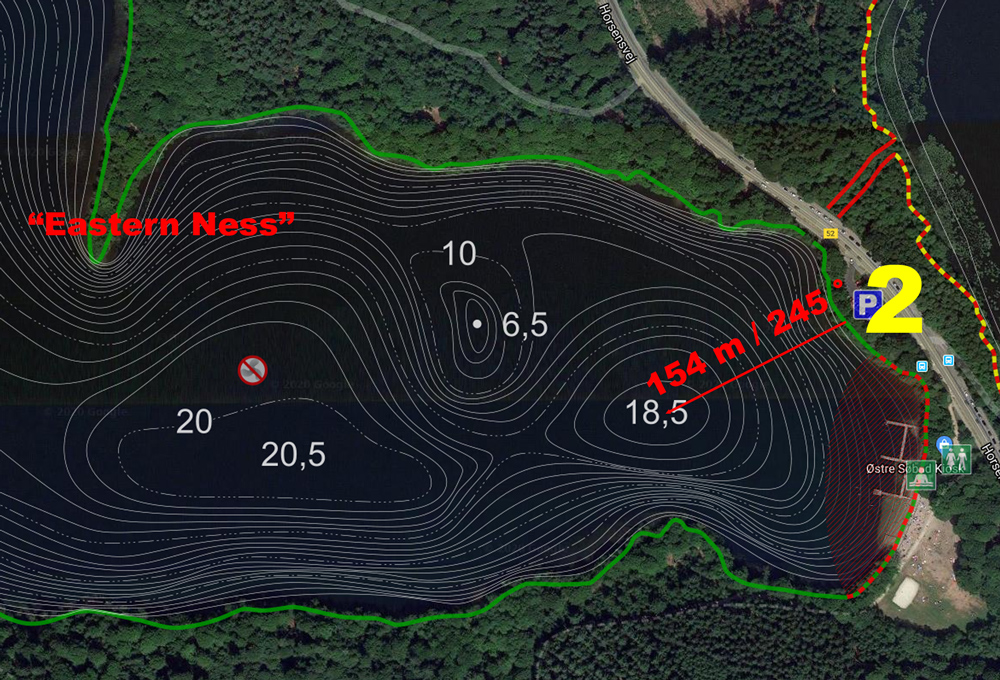
- Two deep points, 18,5 meters and 19,0 meters respectively. It is dark, cold and muddy down there and there is nothing to see but, you can use them for exercises, such as controlled ascent with safety stop(s) from 18 meters. Since we have access to an official depth contour map and we already did the contour mapping exercise, we did not map these two spots in detail. All we did was look up their position and calculated how to get there from one of our recommended entry points using compass and stopwatch. And then we tried out our own recipes and documented the dive with a dive log and photos. Notice, there is a 20,5-meter-deep point in the lake, but we do not recommend going there because it would be hard to get an injured diver ashore. The closest point is the “eastern ness” (with no name that we are aware of). You cannot get there by car so a rescue crew would have to walk at least 500 meters through forest. And it is not visible from the path surrounding the lake, so it will be hard to summon help.
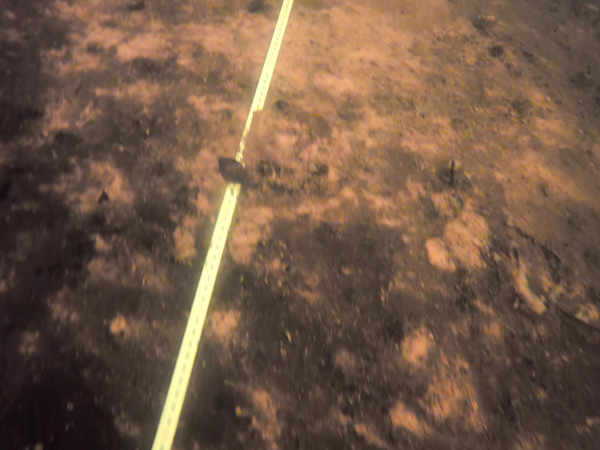
- A tiny wreck at the north end of the lake at 3,5 meters depth. We found it, surfaced and made cross-bearings with our compasses to points recognizable on Google Maps. Using the position found in this way, we wrote an instruction on how to find it again.
18,5-meter deep point at east end
This is located 154 meters (~ 8 minutes) from entry point 2 at bearing 245°:
Here is the dive log and a photo:

Lessons learnt
We did not manage to find the 18,5-meter spot before the contour started to rise. We only found 16,5 meters. We thought it would be easy to just follow the sloping bottom to find the deepest point, but we learned that is impossible to spot the slope direction, partly due to low visibility and partly due to the fact that the slope is only 5 – 10 centimeters per meter or less. Hard to see. So, we should have put more attention to our compasses. We also learnt that it is not a good idea to have both your compass and your flashlight mounted on a Goodman handle on your left hand. For the following dives we chose to have the flashlight in our right hand. That way, we can point with the flashlight and keep our left arm bend sufficiently to align the compass with the direction we are going.
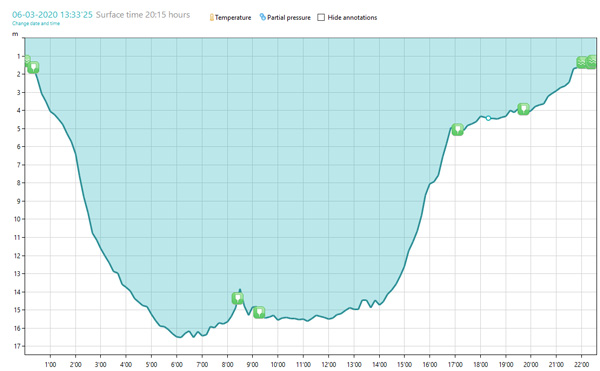
19-meter deep point at west end
Can be reached from entry points 3 and 4 at Swimming Resort West. What we did was swim out from 4 and return to 3:
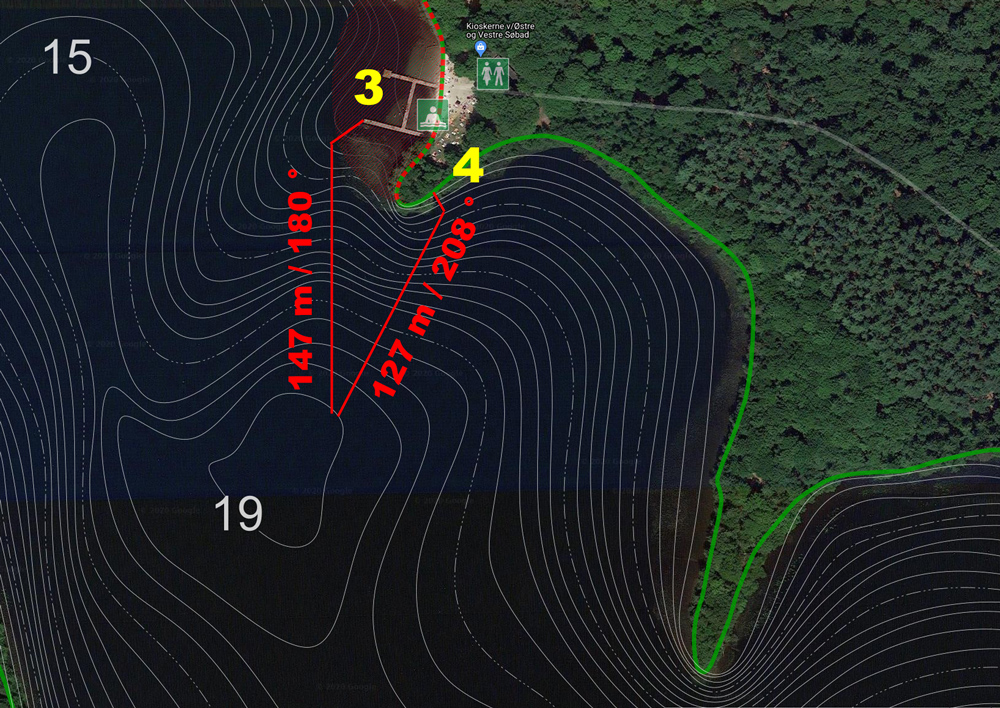
Calculated time for the out leg: ~ 6:20 min and for the home leg ~ 7:35 min. Dive log:

Lessons learnt:
This time the compass navigation worked much better and it was also easier for us to spot the contours of the seabed. We hit our targets spot on. We did not reach 19,0 meters but only 18,5 meters. Our first suspicion was the calibration of our dive computer – not set for freshwater that weighs less. Thus, if calibrated for salt water, it will show less depth in fresh water. But we concluded that it must be set for pressure depth which is closer to geometric depth in freshwater than in salt water. Pressure depth is what matters to a diver with respect to decompression, partial pressures etc. So, our only conclusion is that the available depth profiles for Almindsø Lake are a little bit wrong. That makes sense: If they were measured by throwing a sounding line into the water as it was done in earlier days, the plummet is likely to have sunk at least 0,5 meters into the seabed because it is so soft. If it was measured with echo sounding, we find it likely that the sound waves will not have bounced off the visual seabed but somewhere below it. Never mind, it does not matter for our purpose.
Another lesson learnt is, that these deep points are no good for training for inexperienced divers: They need to be comfortable with the dark and the cold, to be able to handle a flashlight in addition to their other gear and they need sufficient buoyancy control and mastering of fin kick methods to be able to stay off the seabed and not stir it up. The risk of separation is severe.
Tiny wreck at North End.
By searching the approximate area, we eventually found the wreck at 3,5 meters depth, surfaced and measured cross-bearings for objects visible on Google Maps. Here is what we found:

From this calculated position we made the following recipe for finding the wreck:

The easiest way of finding the wreck is to surface swim to the isolated trees at the north end of the lake, find the westernmost of them, then descend and head bearing 210° for 38 meters (2 minutes).
We have photos of the wreck, but we like to keep our visitors curious.
Divemaster Candidate Claus Nedergaard Jacobsen